
How to Add Multiple Links on Your Instagram Bio
Have you ever wanted to share more than one link on Instagram?
For the longest time, you could only add one link to your Instagram bio, forcing people to use third-party apps like Linktree or Milkshake if they wanted multiple links in their Instagram bio.
Today, you can actually add up to 5 links in your bio.
But to be honest, it’s not very user-friendly OR visually appealing.
That’s why I still like to use a Link in Bio Page to help my followers find precisely what they need, whether that’s getting to a blog post, my YouTube Channel, or downloading my app for Bootstrap Biz Advice.
Since I’m so familiar with Canva, that’s where I chose to build my #linkinbio page.
And I absolutely LOVE how it looks!
So, if you’ve been looking for a better strategy for how to add multiple links in your Instagram Bio, here’s how to create your own branded Instagram “link in bio” page using Canva..
What a Canva Link in Bio Looks Like
Here’s what my Canva website looks like when used as a bio link:
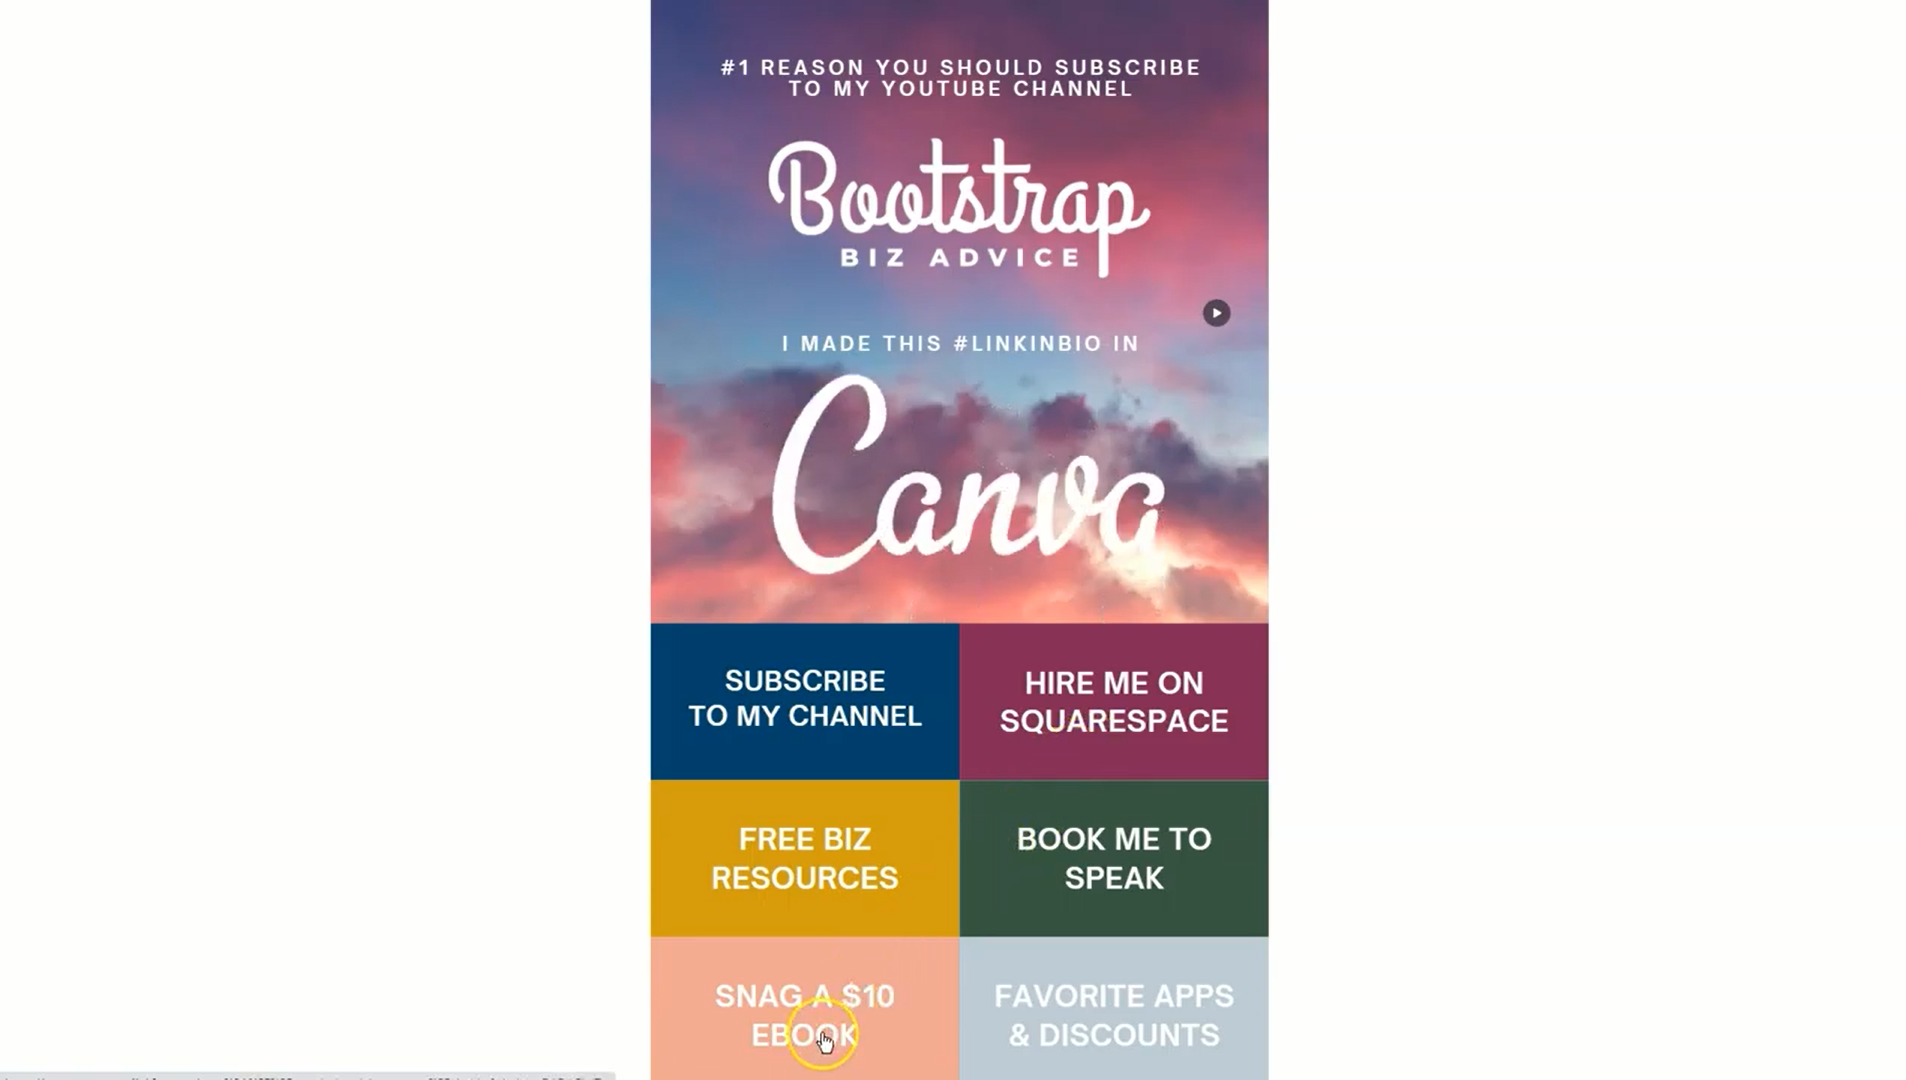
At the top, I’ve added a subtle animation of the Canva logo to draw the eye. Under that, there's a photo background with a short description of my YouTube channel.
Then, I’ve added six clickable buttons — all color-coded to match my brand’s color palette — that send traffic to different parts of my business:
My YouTube channel
Free resources
Book me to speak
Hire me on Squarespace
Snag my eBook shop
My favorite apps & discounts.
It’s simple, clean, and best of all — you can make your own in under an hour using Canva.
If you’re still wondering which links to put in your Instagram Bio, just think through which parts of your audience could find you on Instagram, and where they might want to go next.
How to Create a Link in Bio Website Using Canva
This is one of Canva’s most underrated features, and I’m always surprised by how many people don’t know about it.
To get started, hop into your Canva account and type “bio link website” into the search bar.
Once you hit enter, you’ll see a variety of templates designed specifically for this purpose.
All of these templates are already perfectly sized for your mobile. So when someone clicks the link in your Instagram bio, your Canva site will display beautifully without needing to pinch and zoom. Just be careful about making the page too long, or else people may need to scroll if you extend past the original dimensions.
Find a template you like, and hit “Use this template.”
From here, you can fully customize the page with your brand colors, photos, and call-to-action buttons.
How to Customize Your Link in Bio Page
After finding a layout, you’ll then need to customize it to match your brand and the number of links you want to include.
Here are some tips I found most helpful when creating my own Link in Bio Page.
Leave Some Space at the Bottom
I recommend leaving the bottom of the page open if you want everything to fit within one screen without scrolling.
If you need more space, you can simply click and drag up the elements to make some space at the bottom of the template, and the text on your buttons won’t get cut off.

Group & Link Your Buttons
This part is so important!
Whether you need four, seven, or you’re just trying to learn how to add two links in your Instagram bio, you need to make sure that all of the elements are grouped together that you want to create as a button.
That means the background and the text are combined into one clickable area. While some templates will already be set up like this, others require you to do a bit of ungrouping and regrouping.
Sometimes the templates are already set up like this, but other times you will need to regroup elements.

Here’s what I mean: Let’s say you’ve selected a “Bestsellers” button, but only the background is grouped.
You’ll need to ungroup the background and text, then regroup the text and any background elements together. The goal is for the link to work properly no matter where someone clicks the button.
Once your buttons are correctly grouped, you can click the element, go to the top-right of your screen, click the link icon, and paste the URL to which you want to redirect traffic.
Do this for each button in the template.
Rename Your Design
By default, your Canva link will display the name of your design.
If you don’t rename your file, the default Canva template name may show when people hover over your page. (For example, mine shows up as “@lashondambrown Link in Bio.”)
Instead of something generic like ‘Template 1,’ I recommend renaming it to your Instagram handle or a custom title.

Publish Your Canva Page as a Website
Once you’re happy with your design, hit Share > Publish as Website.
Then, what’s going to happen is that it will ask you to choose your layout style. As you click through the options, Canva will show a quick preview of what it will look like for your user on the front end.
I typically go with "Scrolling" for a smooth mobile experience, but you can also choose "Classic Navigation" or "Presentation" depending on what best fits your content.
Canva will generate a URL for your new page — and this is what you’ll use in your Instagram bio (or anywhere else you want to link to multiple destinations at once).
How to Create a Branded Link (Optional but Recommended)
Once you have designed your new Instagram Link in Bio website using Canva, we need to customize that link.
When using Canva for my Link in Bio, I had lashondabrown.com/gram-fam in my bio. I didn’t have that Canva link, and it looks a lot more appealing in my bio than what is provided directly from Canva.

You can customize your link in many ways, regardless of which platform you used to build your website (e.g., WordPress, Squarespace, Wix).
But here’s how I clean up the Canva link and make it branded using my Squarespace website:
Log in to your Squarespace account and click ‘Settings → Advanced → URL Mappings’.
It will look like a lot of scary code, but it’s not as complicated as it seems.

Simply scroll down till you have some empty space, and use this structure to create your redirect:
/[desired URL] -> [https://yourcanvalinkhere.com] 302
Here’s how it looks for me:
/gram-fam -> https://design/DAEax01uiZg/_KCyWUWf9X15unGqERo9gQ/view?website#2 302
So, anytime someone goes to lashondabrown.com/gram-fam, they’ll be redirected to my Canva design.
The 302 just tells Squarespace this is a temporary redirect, so I can update it later without breaking the link.
Now you’ve got a branded, easy-to-remember URL you can use on Instagram and other platforms.
Final Thoughts
If you’ve ever wondered how to add multiple links in an Instagram bio, give this Canva method a try. It’s simple, customizable, and looks way more professional than having 4-5 long URLs squeezed into your bio.
This is one of my favorite Canva hacks for social media — and you can do it with just a little bit of coding (for the branded URL) and zero outside tools.
But it’s not the only way I use Canva for Instagram.
Canva has also been an unbelievable tool for creating beautiful carousel posts and dramatically improving my story engagement.
Also, if you haven’t tried Canva Pro yet,click here to start your 30-day free trial — you’ll unlock premium templates and the ability to fully customize your mobile site!

