
How to Sell an eBook Online ABSOLUTELY FREE using Canva + Payhip
Are you looking for an easy way to sell your eBook online? Selling an e-book is a fantastic way for you to take your service-based business and turn it into an impulse buy. Now many of you have watched my How to Make an ebook video, but I have never taken you through the entire process. So in this post, I am going to show you how to easily sell your ebook online.
How to Sell an eBook Online
1. Create eBook in Canva

You want to make sure that your template is the same size as a normal sheet of computer paper. Some people like to print their ebooks when they purchase them online. So if you use a template that's not the same size you're going to make it more difficult for your customers to continue to use this resource. So definitely keep that in mind from the beginning. You can utilize the magazine template within Canva that is an 8.5 x 11 template.
The other thing is watch your colors. You definitely want to incorporate your brand photos within your design, but you also want to keep printing in mind. So try not to use full color backgrounds within your ebook. So you can see how I incorporated this green and a little bit of black here. But once you get inside the e-book, it's mostly white with just a pop of color at the top.

So when you finish designing your ebook with Canva, download it as a PDF. I would strongly suggest that you do not click PDF Standard. Although this will be a smaller version of your ebook, we want it to be high enough quality for people to print if they choose to do that. So you'll just click on PDF Print and download it to your desktop.

And as you can see, this is what the finished design looks like.

Once you design your ebook you want to show people what they can expect once they get your resource so you're going to need to create some graphics. So go back, click the button in the top right and this time download PNG images of your ebook.
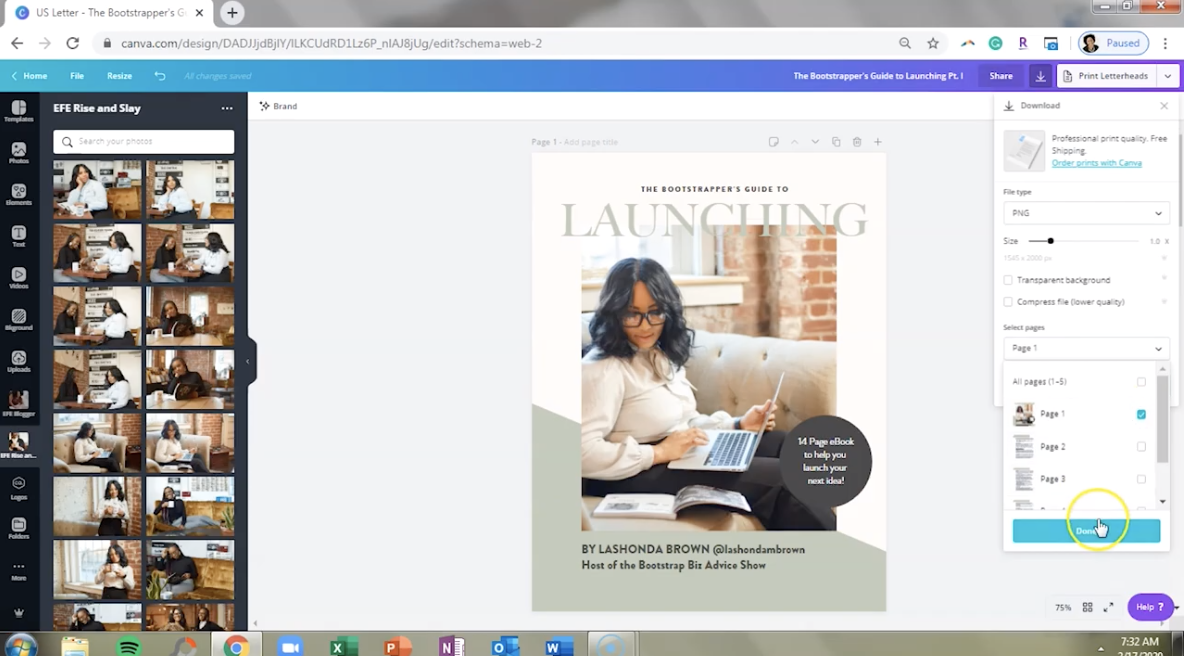
Your cover is something you definitely want to utilize for your design. But we're also going to download a couple of the interior pages, just to show people the quality of the content they can expect.
2. Create Graphic with SmartMockups
So now that I'm inside Smartmockups, I want to design two different things. One is a colorful graphic to show the cover of the e-book and the other is a smaller graphic to show those interior pages. So I selected this one by hovering over Print selecting Magazines and Books. And that's the category we're in and I chose Portrait Magazine on the table.

So all I need to do is Upload Image. You can also use Canva, but I like to download the image itself. Click on that cover and then you can adjust it. As you can see it drops in that image directly on top. And I am going to zoom in so that it fills that cover. Now we’ll crop and continue, and now we have our graphic.

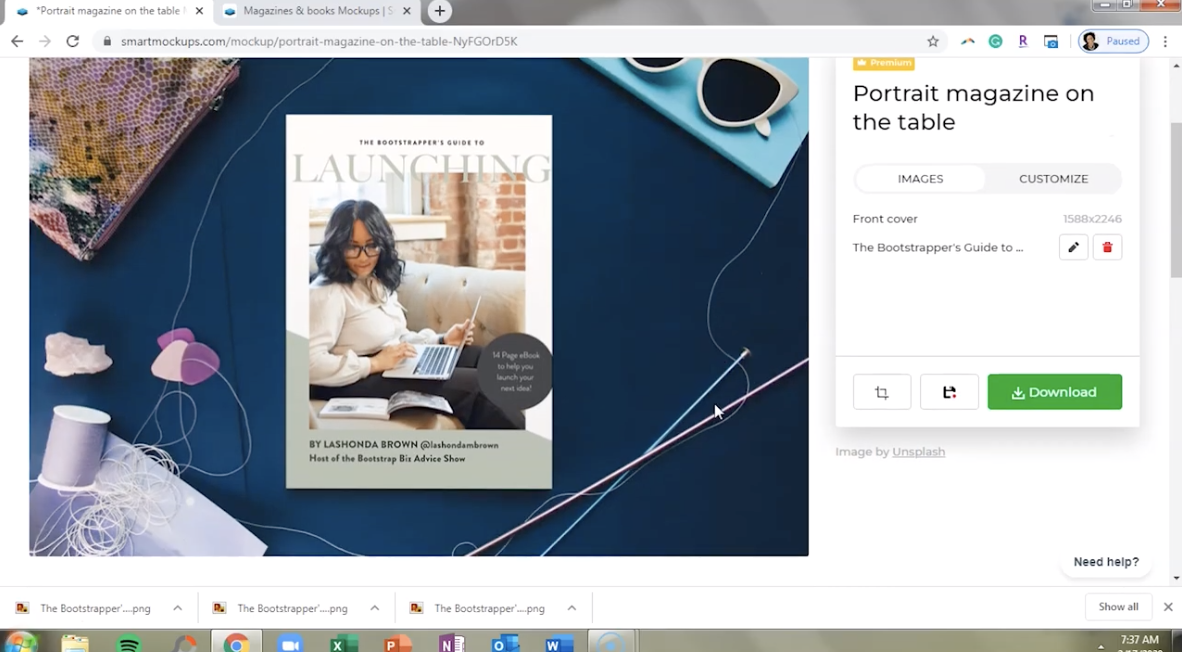
What's great about Smartmockups, as you can see by these boxes around it, is this is going to have a transparent background. So we'll upload the other side.

We did mission on the left. So we'll do Audience on the right. And again just hit those plus signs. To resize it cropping continue and now you've got the interior of your ebook, and you're using the actual pages from the e-book. But again, it's so small that people can't read it. So just because they can see the inside doesn't mean they won't click to buy. And now will download that high-resolution image.
3. Set up Payment Processing with Payhip
So we've got a colorful version of the cover. We've shown the interior pages. And now what we need to do is to hop into Payhip to set up our payment processing. Payhip is the easiest way to sell digital downloads and memberships. They make it a piece of cake to sell and promote your ebooks, membership software, design assets, music, or any other type of digital product directly to your customer.
Now before I sign up, let me take you to the pricing page to show you how they make their money. If you click on pricing you'll see that they do have a free forever plan, but you need to look at the fine print. On top of their five percent transaction fee. You'll also have to pay PayPal or Stripe for their transaction fee. So in my opinion when you get started with Payhip, having a free account is the way to go.

But as you continue to sell your resources, if you feel like you would benefit from upgrading to a Plus account so that three more percent of your income goes to you, you can pay $29/month. And if things continue to progress, you can upgrade to a pro account so that you don't have to pay any transaction fees to Payhip. However, you will still have to pay PayPal or Stripe. So this is just something to keep in mind. There is no completely free option within Payhip, however, the transaction fees are very reasonable. And they are not in control of your payment processing fee. Their transaction fees are how they make their money with their site.
On the homepage, they make it super easy for you to sign up. So just type in your email address, and click Get Started. Now, once you choose your password, it's going to ask you a little bit about yourself.
And here is something to keep in mind. This is the name that will be displayed on your store. Now I associated this with my About 90 Marketing email address, but I am going to be using Payhip to sell resources to the people that watch me on YouTube. So, in this section, what I would like to put instead of the name of my business is the name of my community. So just keep that in mind as you name your site.

Then click Continue. Again, whatever you put in here as your username will be your link. So I like that everything is branded for Bootstrap Biz Advice because that's what these resources will be. Then we'll click Get Started Selling.

This is what the dashboard looks like. And as you can see it, let me know that I completed 25% of my store setup. So if we scroll down here, it has a button, for you to add your first product for you to set up checkout, you can add a profile image, a short bio, and you can customize the store design. So what I'm going to do now is just simply add my first product.

And this is going to be a digital product. You can see the options to sell a physical product or subscription billing.
So in order to add a digital product, we need to upload that product file, which is going to be that PDF. Then we need to choose the title of the product. Then we need to select a price and I'm going to leave it in US dollars.
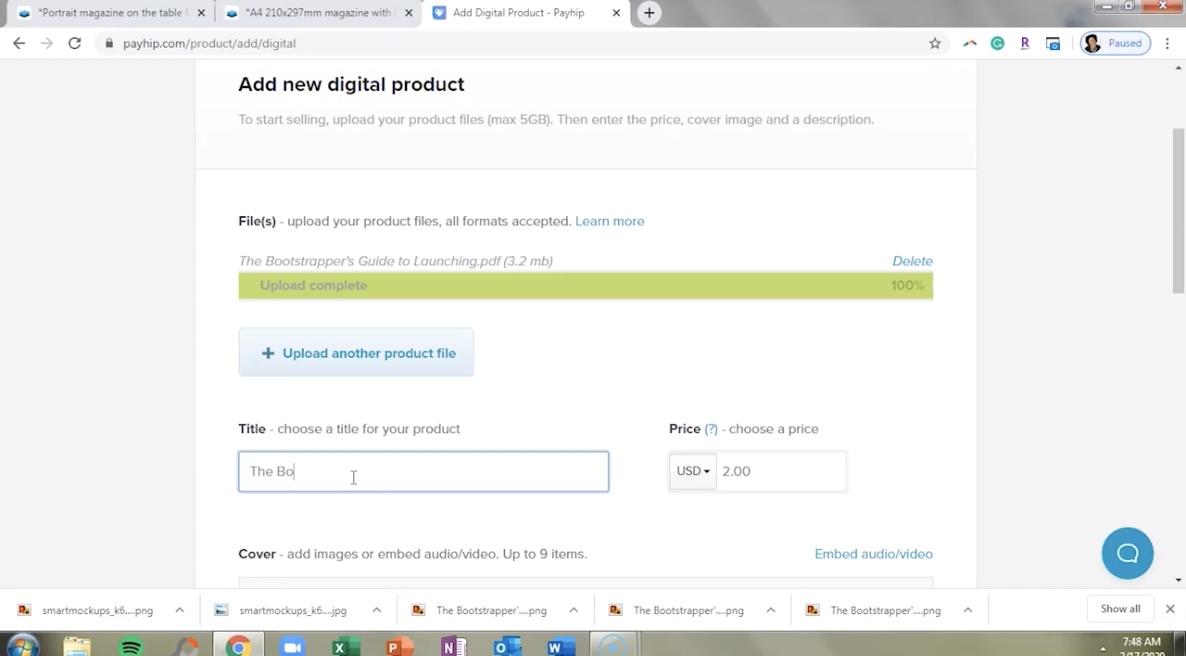
Now we're going to add images you can add up to nine images. So what we'll do is we'll upload that cover, which was a great thing that we downloaded that by itself. And you can see the recommended minimum image with is 670 pixels. So I think that'll work there. And you can type in the description for your product. So once you finish ready to start selling your product add that product.

And so now it gives you a product link that you can copy. And it will show you your payment page.

So I think that this is absolutely beautiful. It makes it super easy for you to sell your resource.
And what we need to do is enter our payment details in order for us to be able to collect payment. So you can connect your PayPal account or you can connect Stripe.
4. Add to Squarespace VIP Vault
Now the reason why I'm putting it inside the VIP Vault is, if people like to use my free resources, I want to give them an opportunity to support the channel. So I'm going to put that graphic here. Then I'm going to add a text box to put the product description that I put on Payhip. And then I'm going to add a button. I think we'll do a small one, and the button will link to the Payhip page.

We're going to say: “Buy eBook $9.99.” And here where it says click-through URL, that is where we're going to copy that link from Payhip. So we'll just go back. And there's a link to this page. We’ll copy that. Paste that here. And then we'll copy our description, and we'll paste that in here.

So what I will do is, when I send out an email this week using Flodesk, I will link to my VIP Vault and I can also link directly to the product page.
5. Promote with Flodesk
Once you login to Flodesk, go ahead and click on the Create New button and on the side you will see categories for email templates, and we're going to click on make money and then the course sale announcement template.

Then click on Customize. And you can delete the sections that you don't want to use by clicking on the section and hitting the trash can. Then we'll double click on this image here. Upload image from our desktop. And again, we've got that SmartMockups image.

And then all you need to do is type a little email. You can leave this section if you want. You can also delete it. And simply add a button by clicking on the plus sign. Add the button and then copy the link to the product.

Payhip is a fantastic resource for selling digital products and memberships ABSOLUTELY FREE. They just take a 5% transaction fee on whatever you sell. Sign up at http://www.lashondabrown.com/payhip to give it a try.

